Studio MCP: Let AI Assistants Read Your Studio Bots
Ask your AI assistant, such as Claude, ChatGPT or Grok, questions about your Authava bots and their conversations. What did people ask this week? Which questions keep coming up? What happened in yesterday's conversations? Studio MCP lets your assistant read your bots' conversations and answer, so you don't have to read through Chat History yourself. It's currently read-only: the assistant can read your conversations, but it can't change your bots.
MCP (Model Context Protocol) is the open standard that makes this possible. It lets AI assistants connect to tools and data. Any assistant that supports remote MCP servers can connect. Whether yours can, and on which plans, is set by each assistant.
Which direction is this? Studio MCP lets an outside AI assistant read your Studio account. To let your bot reach out to your own systems during a conversation, see MCP Gateway.
How Do I Connect Studio in Three Steps?
- Turn on MCP Access. In Studio, open Settings, find the MCP Access card, and turn on Allow MCP clients to use my login.
- Add Studio to your assistant. In your assistant's settings, add a remote MCP server (often called a "custom connector") with this URL:
https://studio.authava.ai/api/mcp - Sign in. Your assistant opens the Authava sign-in page. Sign in with your usual Studio login.
That's it. Now ask your assistant: "What are the top five questions people asked my bots this week?"
There's no API key to create and no code to write. In Claude, Grok and ChatGPT you add Studio in the app's settings, and in Claude Code it's one command. The sections below show each step in detail.
What Can I Ask?
Ask in plain language, the way you'd ask a colleague who has read every conversation:
- "What are people asking my bot this week?"
- "Summarize yesterday's conversations."
- "Which questions keep coming up about pricing?"
- "Find conversations that mention refunds and show me how the bot answered."
- "Which of my bots had the most conversations this month?"
- "Show me this month's conversations with more than 10 messages."
- "Where did the visitors in today's conversations come from?"
The assistant reads the same conversations you see in Studio under Activity → Chat History.
Can My Assistant Walk Me Through the Setup?
Yes. Give your assistant this page's address, https://authava.com/p/studio-mcp, and ask it to walk you through connecting Authava Studio. The three steps above are all it needs. Step 1 happens in Studio, and steps 2 and 3 happen in your assistant.
At a Glance
| Setting | Value |
|---|---|
| Server URL | https://studio.authava.ai/api/mcp |
| Server type | Remote MCP server (Streamable HTTP) |
| Sign-in | Authava sign-in page, with your Studio login |
| Where to turn it on | Studio → Settings → MCP Access |
| Default | Off |
| Access | Currently read-only |
| Covers | Every bot your Studio login can see |
| Tools | 6: list_bots, get_bot, list_chat_sessions, get_chat_session, get_session_messages, recent_messages |
How Do I Turn On MCP Access?
- Sign in to Studio.
- Open Settings.
- In the MCP Access card, turn on Allow MCP clients to use my login.
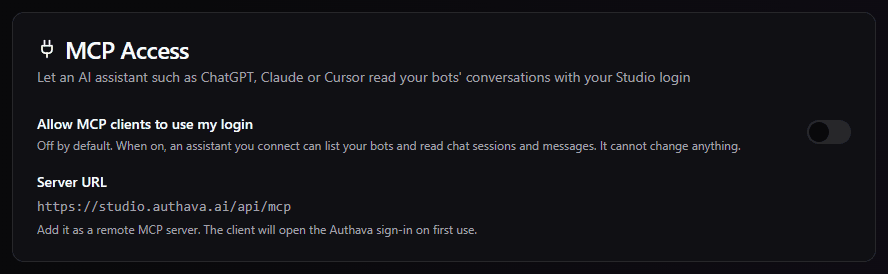
The same card shows the Server URL. MCP Access is off until you turn it on, and each Studio login turns it on for itself.
How Do I Add Studio to My Assistant?
Add https://studio.authava.ai/api/mcp as a remote MCP server, the same way your assistant adds any MCP server. The first time the assistant connects, it opens the Authava sign-in page. Sign in with your Studio login, and you're ready to ask your first question.
Each assistant's own guide has its current steps, and says which plans can add custom MCP servers:
| Assistant | How to add a remote MCP server |
|---|---|
| Claude (claude.ai and Claude Desktop) | Get started with custom connectors using remote MCP |
| Claude Code | Connect Claude Code to tools via MCP |
| Grok | Grok connectors |
| ChatGPT | Connecting custom MCP servers in ChatGPT |
Example: Adding Studio in Claude
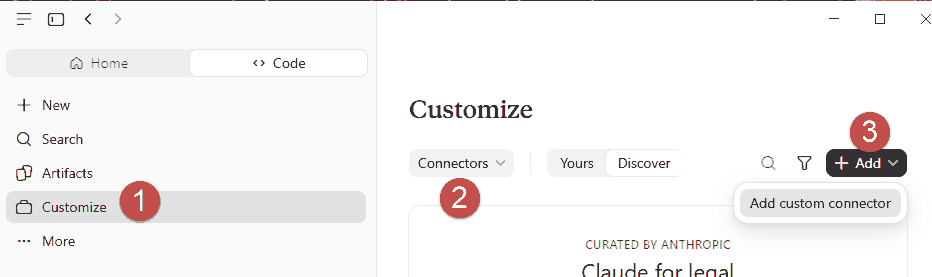
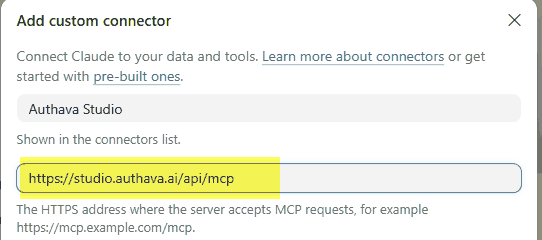
Sample screenshots only. These show one way to add Studio in the Claude app, as it looked in November 2026. Claude's screens change over time, so follow Claude's official guide to custom connectors for the current steps.
Step 1. Open Customize, choose Connectors, then click Add → Add custom connector.
Step 2. Enter a name, such as Authava Studio, and the Server URL https://studio.authava.ai/api/mcp. Click Continue, then sign in with your Studio login.
Prefer to watch? This short video shows how to connect Claude to your Studio bots: Connect Claude to Your Authava Studio Chatbots (MCP + OAuth) (2:51).
Example: Adding Studio in Claude Code
In Claude Code, one command adds it:
claude mcp add --transport http authava-studio https://studio.authava.ai/api/mcp
Then run /mcp in Claude Code and sign in with your Studio login.
Example: Adding Studio in Grok
Following xAI's connector guide: go to grok.com/connectors, click New Connector, choose Custom, and enter https://studio.authava.ai/api/mcp. Then sign in with your Studio login.
Example: Adding Studio in ChatGPT
Follow OpenAI's guide to custom MCP servers, and enter https://studio.authava.ai/api/mcp as the server URL. Then sign in with your Studio login. The guide lists which ChatGPT plans can add custom MCP servers.
Tools
All six tools read. None of them change anything.
| Tool | What it does | Inputs |
|---|---|---|
list_bots |
Lists the chatbots in your Studio account with their ids. It's the starting point for everything else. | None |
get_bot |
Shows one bot's details: name, domain, widget title, greeting and status. | bot_id |
list_chat_sessions |
Lists a bot's conversations, newest first, with message counts and a preview of the first message. Filter by text, date range or minimum message count. Results come in pages. | bot_id, q (search text), start_date and end_date (ISO 8601 with a time zone, both inclusive), min_messages, page, per_page (up to 100, default 20) |
get_chat_session |
Shows one conversation's details: when it happened, where the visitor came from, and the outcome. | bot_id, session_id |
get_session_messages |
Gives the full transcript of one conversation, user and bot messages in order, oldest first. | bot_id, session_id, page, per_page (up to 100, default 100) |
recent_messages |
Shows the latest messages across all of a bot's conversations, newest first. The quickest way to see what people are asking right now. | bot_id, limit (up to 200, default 50) |
Every request is checked against your Studio login first, and each bot's conversations are only read through that bot.
Why Is Studio MCP Read-Only?
Studio MCP is currently read-only, for safety. An assistant can read your bots and their conversations, but it can't change your bots, knowledge, Q&A, settings or conversations. All six tools only read, so your live bot keeps working exactly as you set it up. You keep making changes in Studio as usual.
Which Bots Does MCP Access Cover?
MCP Access is set for your Studio login, not for one bot. When it's on, the assistant can read every bot your login can see in Studio. It can't be limited to one bot at a time.
Each person on your account turns MCP Access on for their own login and connects their own assistant. Each assistant sees the bots that person's login can see.
How Is It Kept Safe?
- Read-only. The assistant lists and reads. Your bots and settings stay exactly as they are.
- Off by default, and turned on by each login for itself.
- Your own Studio login. You sign in on Authava's sign-in page. There's no password or key to copy into the assistant.
- Your account only. The assistant sees only the bots your login can see in Studio.
- Off whenever you choose. Turn off MCP Access and the assistant's next request is refused.
The assistant you connect reads the conversations it needs to answer your question, and handles them under its own privacy terms. Pick the assistant your organization already uses for business data. See How is my data safe with Authava? for how Authava handles your data.
How Do I Turn It Off?
In Studio, open Settings and turn off Allow MCP clients to use my login. The assistant's next request is refused with the message "MCP access is off for this login. Turn it on under Settings in Studio." You can also remove the Studio connection from your assistant's settings.
Frequently Asked Questions
Is Studio MCP read-only?
Yes. Studio MCP is currently read-only, for safety. The assistant can list your bots and read their conversations, but it can't change your bots, knowledge, Q&A, settings or conversations.
Can I connect just one bot?
No. MCP Access is set for your Studio login and covers every bot your login can see in Studio. It isn't set for one bot at a time.
Which AI assistants can I connect to Studio?
Any assistant that supports remote MCP servers, such as Claude, Grok or ChatGPT. Add https://studio.authava.ai/api/mcp as a remote MCP server and sign in with your Studio login.
What can I ask with Studio MCP?
Studio MCP lets the assistant use a common set of read tools to answer questions like "What are people asking my bot this week?", "Summarize yesterday's conversations" and "Find conversations that mention refunds."
Do I need an API key?
No. The assistant opens the Authava sign-in page, and you sign in with your Studio login.
Why does my assistant say MCP access is off?
MCP Access is off by default and is set for each login. In Studio, open Settings and turn on MCP Access for the login you signed in with, then ask again.
Can my teammates use Studio MCP?
Yes. Each person turns on MCP Access for their own login and connects their own assistant.